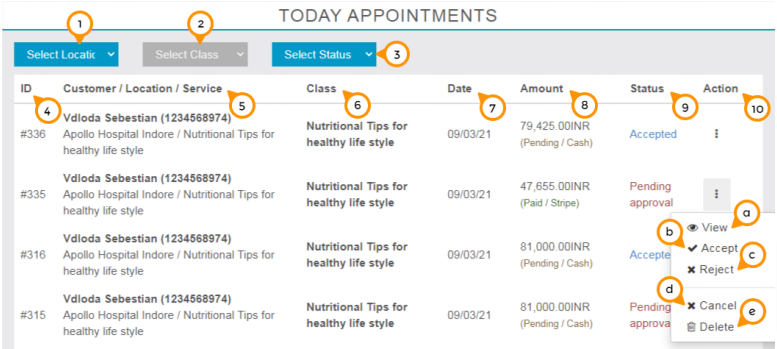
From here you can able to see and manage today’s appointments.

1) From here you can apply the filter by location by selecting the location from the drop-down menu.
2) From here you can apply the filter by class by selecting the class from the dropdown menu.
3) From here you can apply the filter on the basis of appointment status like: Accepted, Pending, Rejected, etc. by selecting the status from drop-down menu.
4) From ID column you can get the unique identification number of the appointment.
5) From here you can get the details about Customer name, Location of appointment and class taken by the customer.
6) Here you can get the class name of the booked appointment.
7) Here you can get the date of the appointment (current date).
8) Here you can get the details about the receivable amount of the particular booking.
9) From status column you can get the current status of the booking.
10) By click on three dots setting tab you can manage the booking completely.
a) View: By click on ‘view’ under setting menu you can able to view the complete details of the appointment. i.e. Booking, Payment, Customer, and service (Class).
b) Accept: By Click on ‘Accept’ under setting menu you will accept the booking and prepared for delivery.
c) Reject: By Click on ‘Reject’ under the setting menu you will deny accepting the booking or in the case booking requests are not matched at the moment.
d) Cancel: By Click on ‘Cancel’ under the setting menu you will cancel the booking by your side. User has a freedom to cancel the booking by his side too depends on your cancelation settings.
e) Delete: By Click on ‘Delete’ under the setting menu you will remove the booking from the platform.
